- Data Professor
- Posts
- How to Create and Deploy a Machine Learning App to Heroku
How to Create and Deploy a Machine Learning App to Heroku
A Step-by-Step Tutorial from Model to Deployment
Chanin Nantasenamat
June 05, 2021

Deployment of a machine learning model is an important phase in the data life cycle. Such a model could be a minimum viable product (MVP) that would allow relevant stakeholders access to the model from which to test and experiment with, which could lead to valuable feedback for further model improvement.
Model deployment may seem like a difficult and daunting task but it does not have to be. In this article, you will learn how to easily deploy a machine learning app to the cloud using Heroku. The advantage of deploying to Heroku is that we don’t have to worry about anything related to the underlying operating system (i.e. no more installing updates, dependencies or maintenance) on which the app is running on.
It should be noted that this article has an accompanying video (How to Deploy Data Science Web App to Heroku) that can serve as a supplement or visual aid from which to refer to.
1. What is Heroku and Why Do We Need It?
Heroku is a platform as a service that deploy apps onto the cloud. The platform officially supports apps created by any of several programming languages such as Node.js, Ruby, Java, PHP, Python, Go, Scala and Clojure. It also supports other languages (such as R Shiny) through the use of third-party buildpacks.
The advantage of using Heroku as opposed to creating your own virtual private server (VPS) running on Linux or Windows operating system is the time and overhead that comes along with maintain the server. Imagine the headache of dealing with software upgrades, dependencies and compatibility issues.
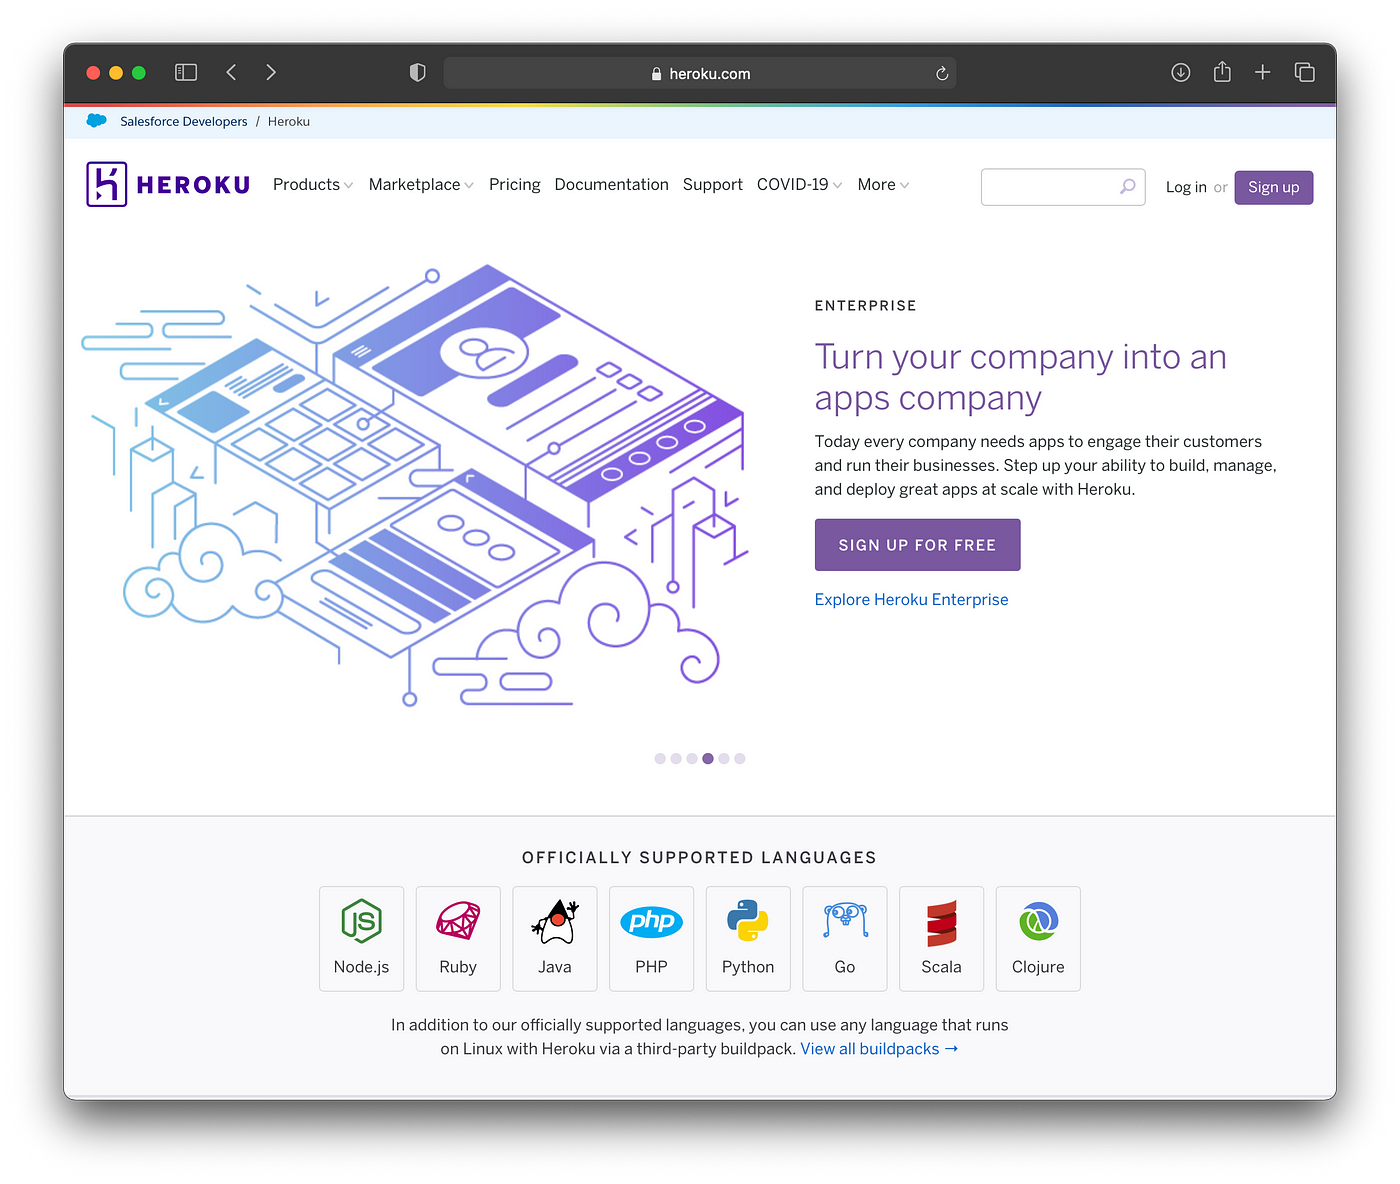
Screenshot of the Heroku website.
For example, I have a Ubuntu server running several of my R Shiny apps, which is running perfectly fine but it is running on Ubuntu 14 and an older version of R, which means that it would not support newer R packages. Migrating all the apps to a new server seems to be an overwhelming task that I still procrastinate about to this very day. All of these concerns would no longer matter if using Heroku. The great thing is that you can get started for free with Heroku as they provide a free tier of about 550–1000 dyno hours per month.
Dynos are isolated Linux containers and serves as the building blocks of Heroku’s offerings (more information on Heroku’s dynos here). They range in size from a small and economical dyno (offering fewer CPU processors and small RAM capacity) to larger and costlier dyno (unlimited CPU processors and up to 14 GB of RAM).
2. What Model are We Deploying Today
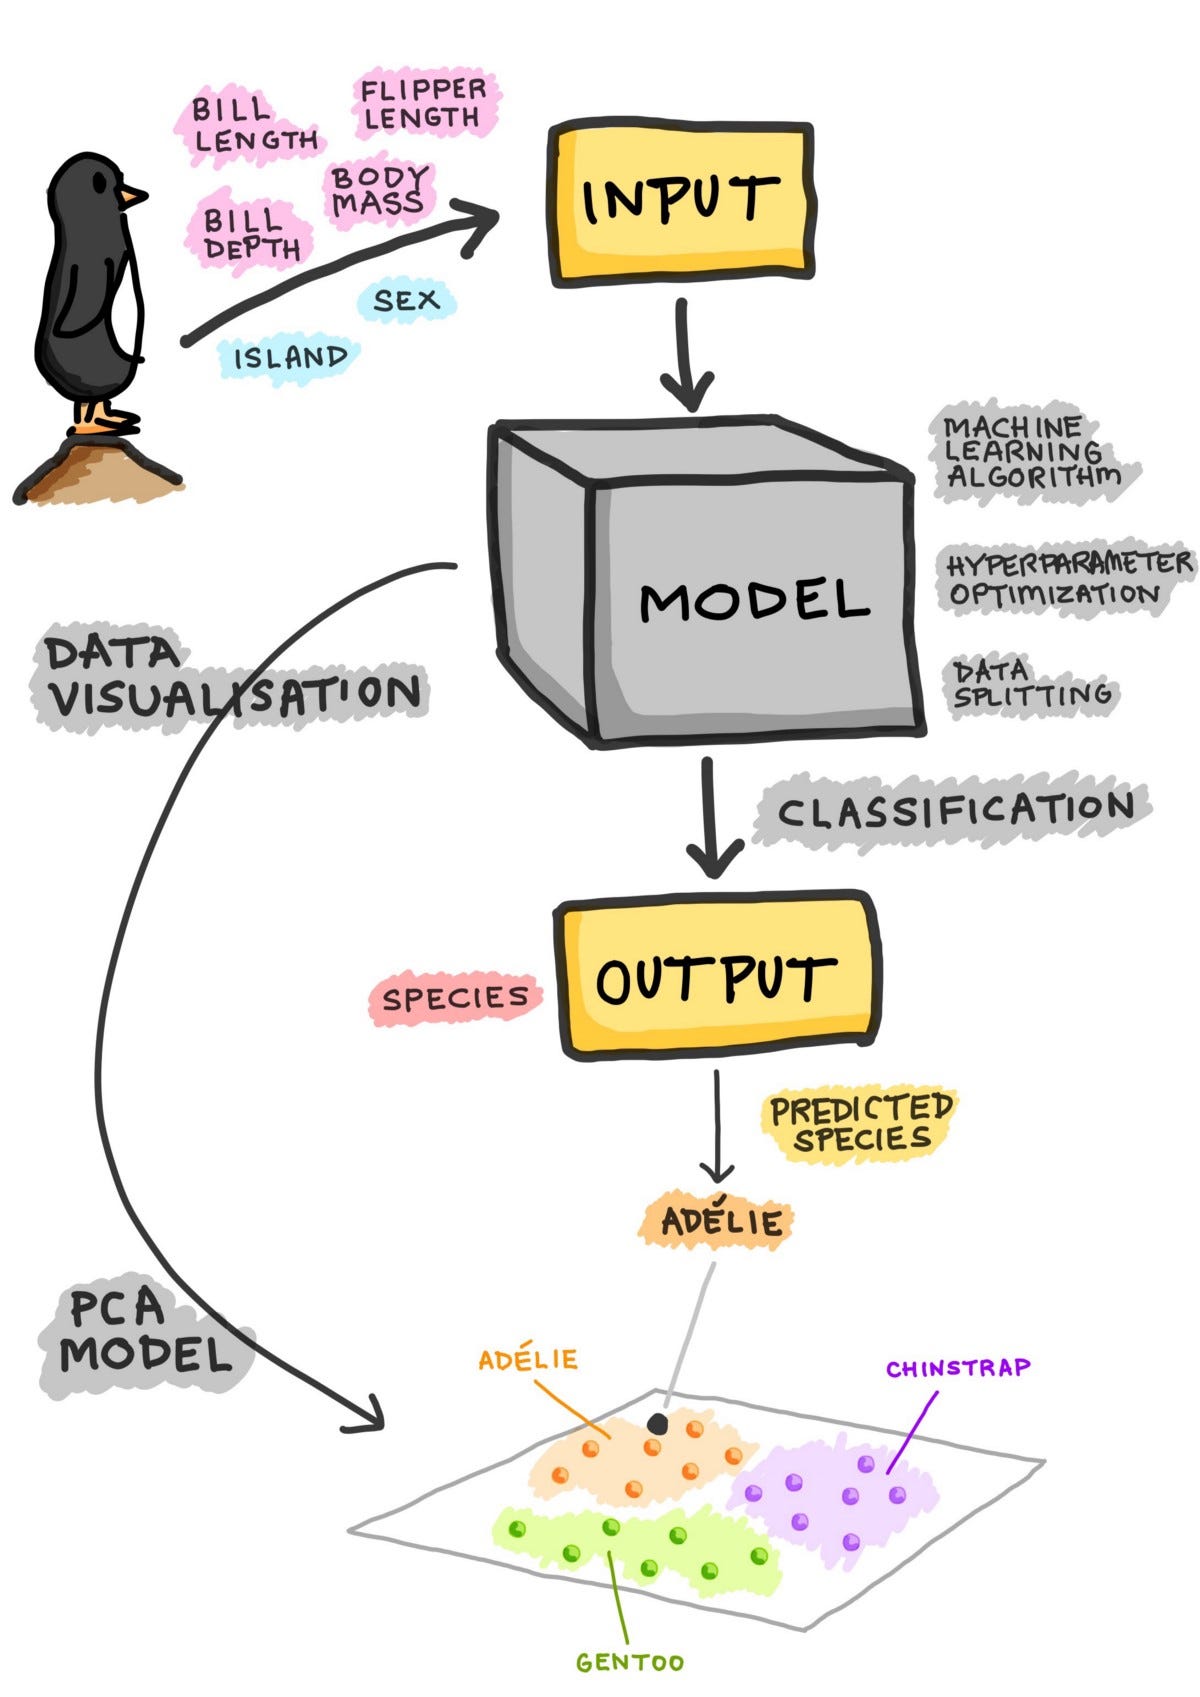
Schematic summary of the Penguins Classification model.
The machine learning model that we are going to be deploying today is the Penguins Species classification model.
In essence, the model will use innate physical characteristics of penguins (e.g. bill length, bill depth, flipper length and body mass) along with their gender and geographical location as input parameters (i.e. the X variables) in order to classify penguins as belonging to one of three species (e.g. Adelie, Gentoo and Chinstrap) which is the Y variable.
A cartoon illustration of the modeling workflow is summarized in the image on the left.
3. Building the Machine Learning Model
Now, that we have seen the schematic workflow of how the model is built, let’s now take a look at the code.
3.1. Code
import pandas as pd
penguins = pd.read_csv('https://github.com/dataprofessor/data/blob/master/penguins_cleaned.csv')

# Ordinal feature encoding
# https://www.kaggle.com/pratik1120/penguin-dataset-eda-classification-and-clustering
df = penguins.copy()
target = 'species'
encode = ['sex','island']

for col in encode:
    dummy = pd.get_dummies(df[col], prefix=col)
    df = pd.concat([df,dummy], axis=1)
    del df[col]

target_mapper = {'Adelie':0, 'Chinstrap':1, 'Gentoo':2}
def target_encode(val):
    return target_mapper[val]

df['species'] = df['species'].apply(target_encode)

# Separating X and y
X = df.drop('species', axis=1)
Y = df['species']

# Build random forest model
from sklearn.ensemble import RandomForestClassifier
clf = RandomForestClassifier()
clf.fit(X, Y)

# Saving the model
import pickle
pickle.dump(clf, open('penguins_clf.pkl', 'wb'))
3.2. Line-by-Line Explanation
In this simple example, we’re going to use the random forest algorithm for classifying penguins as belonging to one of three species (Adelie, Gentoo and Chinstrap) as also mentioned above.
Line 1 — Import the pandas library which will subsequently be used to store values of the penguins dataset.
Line 2 — Read in the penguins dataset from a CSV file using the pd.read_csv() function and store the contents to the penguins variable.
Lines 4 and 5 — Commented text to describe that the code block underneath will be performing ordinal feature encoding
Line 6 — Copy the contents from the penguins variable to the newly created df variable.
Line 7 — Assign the column name 'species' found in the df dataframe that we will use as the Y variable.
Line 8 — Create a list of ordinal features to be encoded and assign it to the encode variable.
Lines 10–13 — Here, the ordinal features will be encoded. The for loop is used to iterate through the 2 features to be encoded as follows:
— Perform one hot encoding via the pd.get_dummies() function and concatenate the newly generated one hot encoded values as new columns into the df dataframe.
— Finally, delete the original column from the df dataframe.
Lines 15–19 — The species column which will be used as the Y variable will now be converted to numerical form via numerical mapping whereby the class label (Adelie, Chinstrap and Gentoo) are mapped to numerical values (0, 1 and 2) as shown in line 15. A simple custom function is created to perform this numerical mapping (lines 16 and 17), which will be applied on line 19. The mapped values are then assigned to the 'species' column of the df dataframe.
Lines 21–23 — The df dataframe will now be separated into the X and Y variables as performed on lines 22 and 23, respectively.
Lines 25–28 — This block of code will now build the random forest model as commented on Line 25. This starts by importing the RandomForestClassifier function from the sklearn.ensemble sub-module. The model is instantiated on Line 27 whereby the RandomForestClassifier() function is assigned to the clf variable. The model is finally trained on Line 28 via clf.fit() function using X and Y variables as the input data.
Line 30–32 — Finally, we’re going to save the model by serializing it with the pickle library where the pickle.dump() function will save the trained model stored in the clf variable into a file called penguins_clf.pkl.
We now have the trained model saved from scikit-learn, which we will now use for model deployment.
4. Building the Web App
Full details and line-by-line explanation on building the Penguins web app in Python using the Streamlit library is provided in the prior article (below).
4.1. Code
Let’s now build the Penguins app using the Streamlit library. The code for building the app is provided in the penguins-app.py file shown below. This app will make use of the trained model (penguins_clf.pkl) for predicting the class label (the Penguin’s species as being Adelie, Chinstrap or Gentoo) by using input parameters from the sidebar panel of the web app’s front-end.
import streamlit as st
import pandas as pd
import numpy as np
import pickle
from sklearn.ensemble import RandomForestClassifier

st.write("""
# Penguin Prediction App
This app predicts the **Palmer Penguin** species!
Data obtained from the [palmerpenguins library](https://github.com/allisonhorst/palmerpenguins) in R by Allison Horst.
""")

st.sidebar.header('User Input Features')

st.sidebar.markdown("""
[Example CSV input file](https://raw.githubusercontent.com/dataprofessor/data/master/penguins_example.csv)
""")

# Collects user input features into dataframe
uploaded_file = st.sidebar.file_uploader("Upload your input CSV file", type=["csv"])
if uploaded_file is not None:
    input_df = pd.read_csv(uploaded_file)
else:
    def user_input_features():
        island = st.sidebar.selectbox('Island',('Biscoe','Dream','Torgersen'))
        sex = st.sidebar.selectbox('Sex',('male','female'))
        bill_length_mm = st.sidebar.slider('Bill length (mm)', 32.1,59.6,43.9)
        bill_depth_mm = st.sidebar.slider('Bill depth (mm)', 13.1,21.5,17.2)
        flipper_length_mm = st.sidebar.slider('Flipper length (mm)', 172.0,231.0,201.0)
        body_mass_g = st.sidebar.slider('Body mass (g)', 2700.0,6300.0,4207.0)
        data = {'island': island,
                'bill_length_mm': bill_length_mm,
                'bill_depth_mm': bill_depth_mm,
                'flipper_length_mm': flipper_length_mm,
                'body_mass_g': body_mass_g,
                'sex': sex}
        features = pd.DataFrame(data, index=[0])
        return features
    input_df = user_input_features()

# Combines user input features with entire penguins dataset
# This will be useful for the encoding phase
penguins_raw = pd.read_csv('https://raw.githubusercontent.com/dataprofessor/data/master/penguins_cleaned.csv')
penguins = penguins_raw.drop(columns=['species'], axis=1)
df = pd.concat([input_df,penguins],axis=0)

# Encoding of ordinal features
# https://www.kaggle.com/pratik1120/penguin-dataset-eda-classification-and-clustering
encode = ['sex','island']
for col in encode:
    dummy = pd.get_dummies(df[col], prefix=col)
    df = pd.concat([df,dummy], axis=1)
    del df[col]
df = df[:1] # Selects only the first row (the user input data)

# Displays the user input features
st.subheader('User Input features')

if uploaded_file is not None:
    st.write(df)
else:
    st.write('Awaiting CSV file to be uploaded. Currently using example input parameters (shown below).')
    st.write(df)

# Reads in saved classification model
load_clf = pickle.load(open('penguins_clf.pkl', 'rb'))

# Apply model to make predictions
prediction = load_clf.predict(df)
prediction_proba = load_clf.predict_proba(df)

st.subheader('Prediction')
penguins_species = np.array(['Adelie','Chinstrap','Gentoo'])
st.write(penguins_species[prediction])

st.subheader('Prediction Probability')
st.write(prediction_proba)
4.2. Launching the App
We are going to launch the app locally on our own computer. Firstly, make sure you have streamlit installed and if you haven’t already you can do so using the following commands:
pip install streamlit In the terminal, we can now launch the app (the penguins-app.py file) using the commands shown below:
streamlit run penguins-app.pyIn a short moment we should see the following output in the terminal.
> streamlit run penguins-app.pyYou can now view your Streamlit app in your browser.Local URL: http://localhost:8501
Network URL: http://10.0.0.11:8501
Then a browser should pop up, giving us the Penguins app.
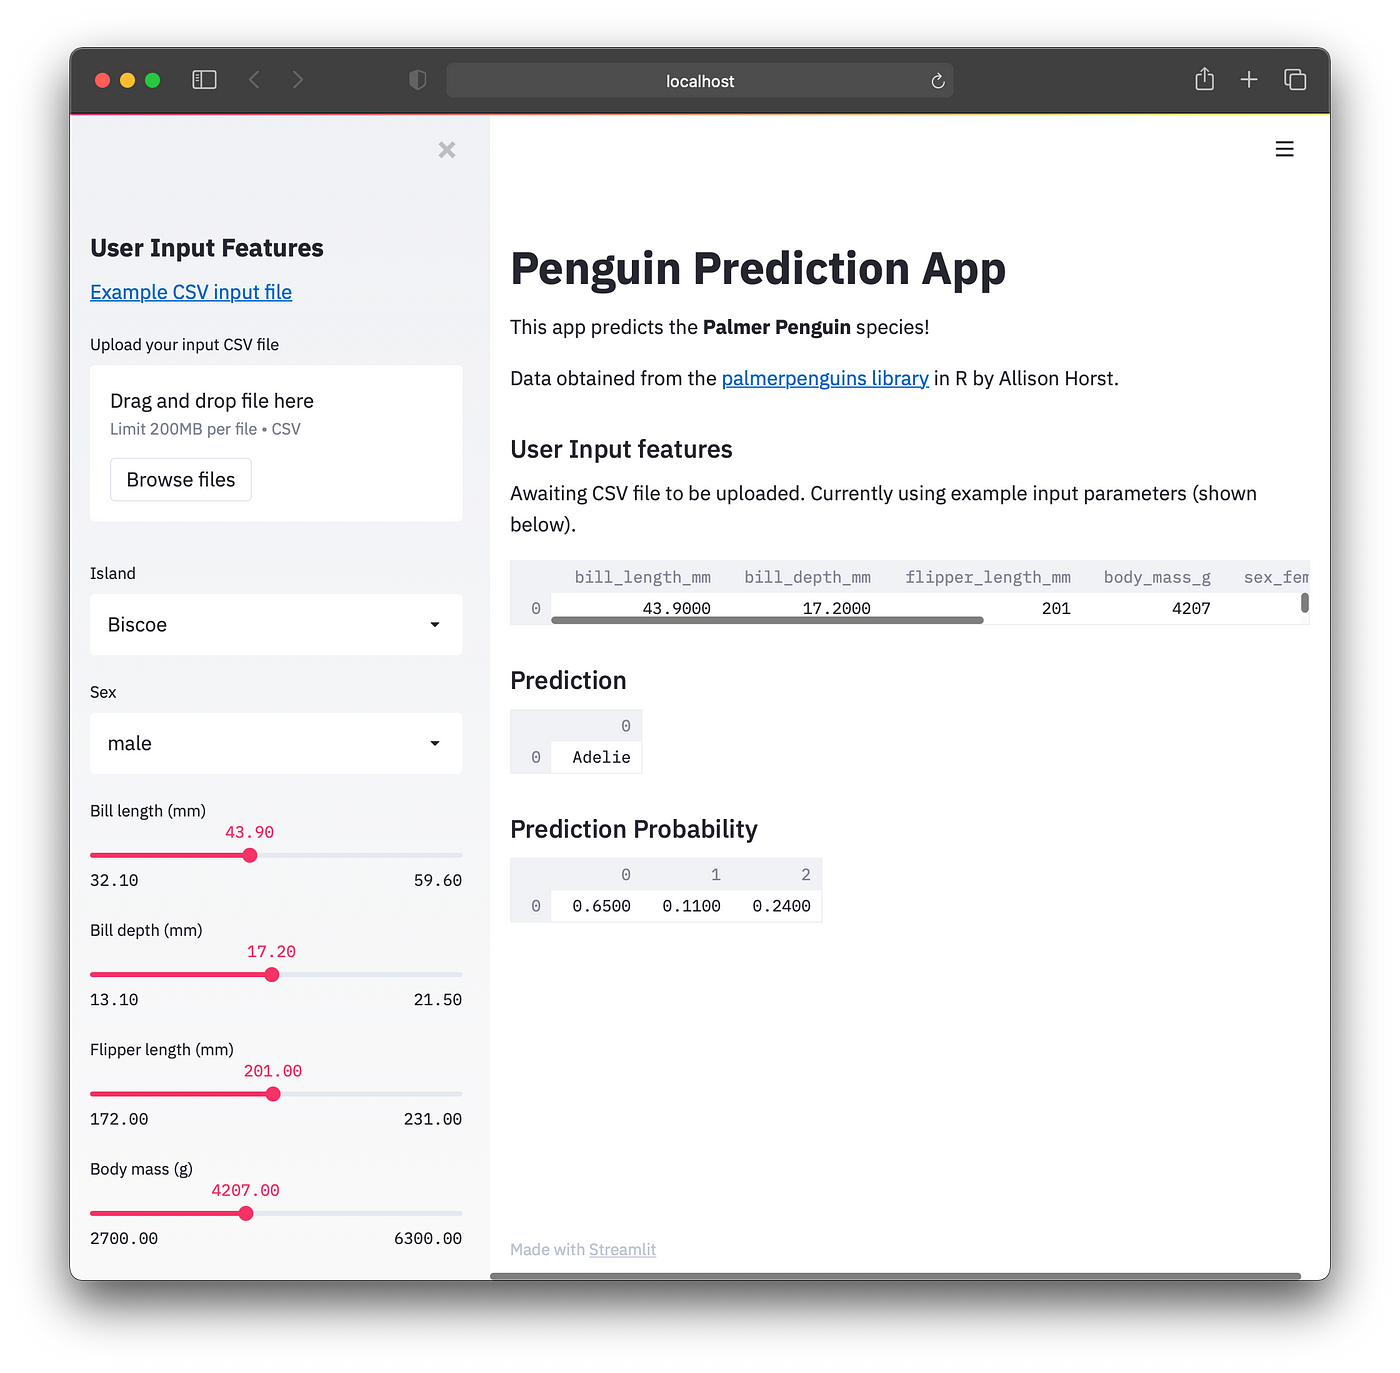
Screenshot of local version of the Penguins App.
Now that the web app works locally, we will now proceed to deploying it onto the cloud.
5. Repository for the Penguins App
5.1. Creating a New Repository
Firstly, we will create a new repository on GitHub and we will name the repository to be penguins_heroku, which can be entered into the text box for Repository name. Then tick on Add a README file and click on Create repository.
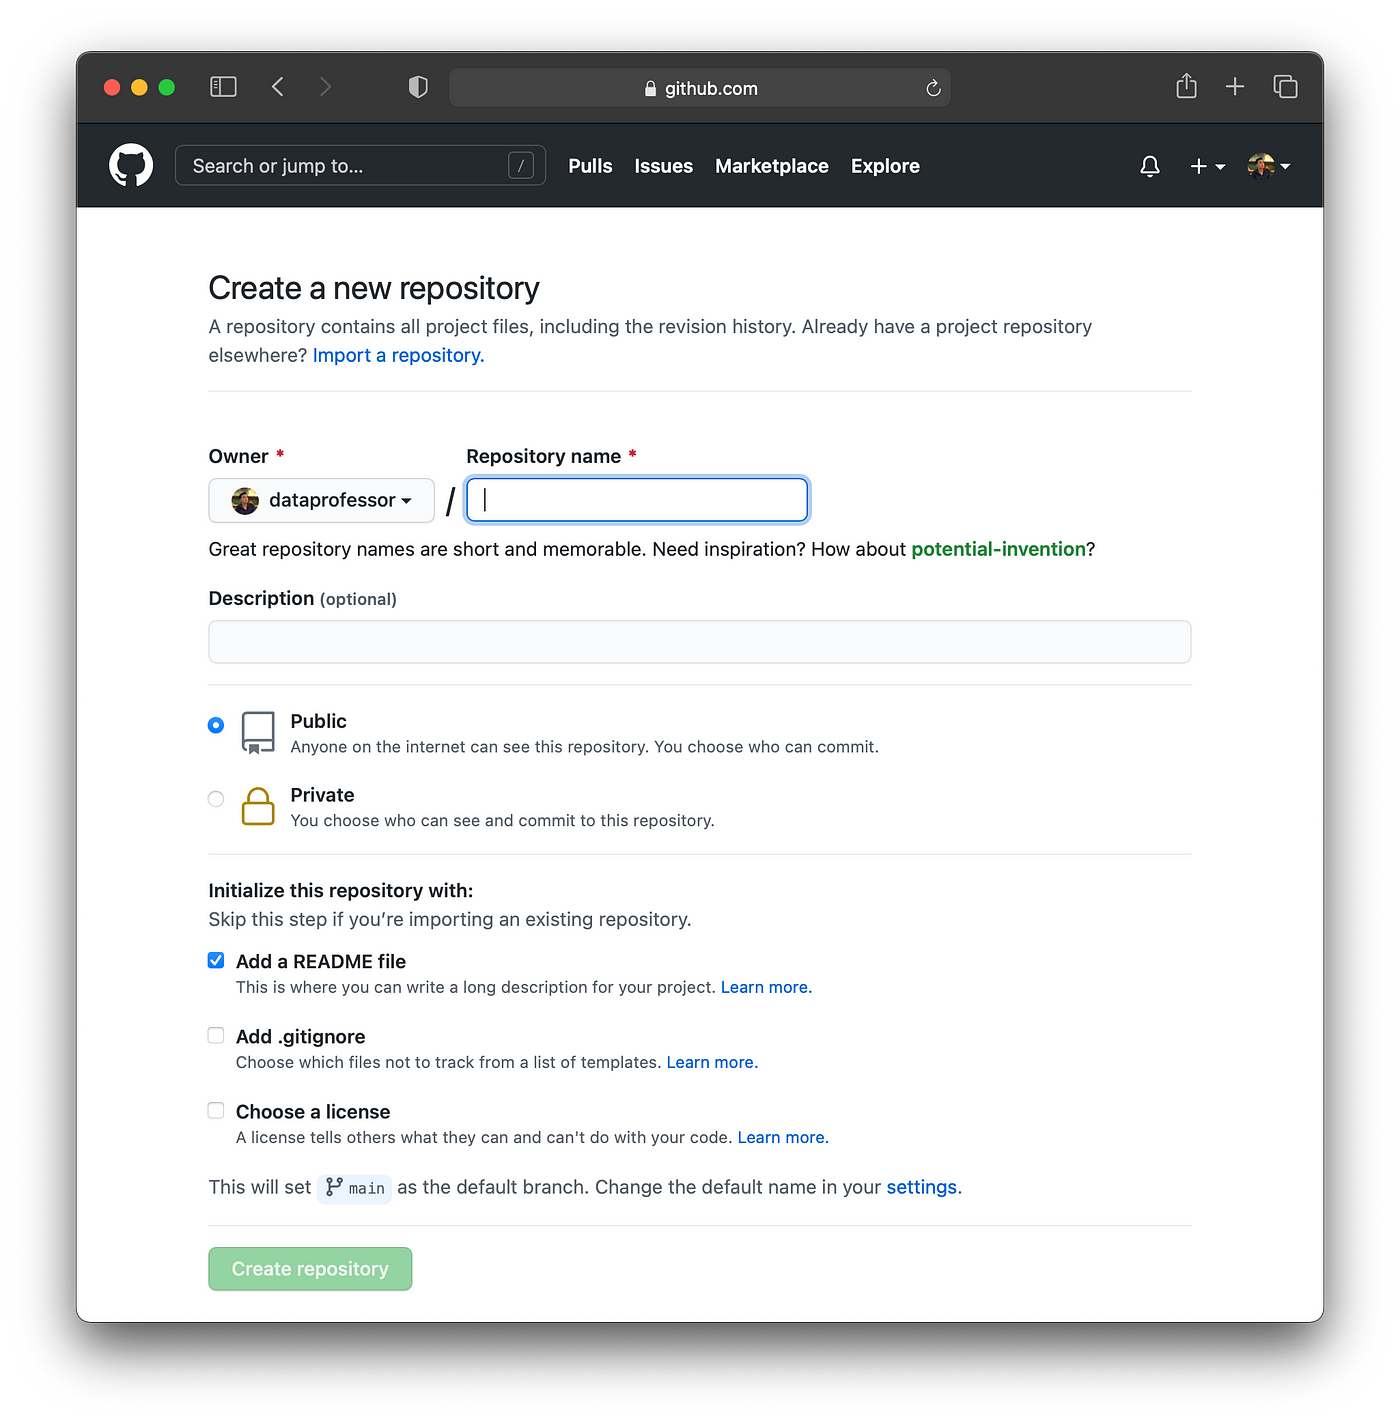
Screenshot for creating a new repository on GitHub.
Secondly, we will upload the trained model (penguins_clf.pkl) and the web app (penguins-app.py) to this new GitHub repository. This can be done by clicking on Add file > Upload files. Then choose and upload the above 2 files (penguins_clf.pkl and penguins-app.py).
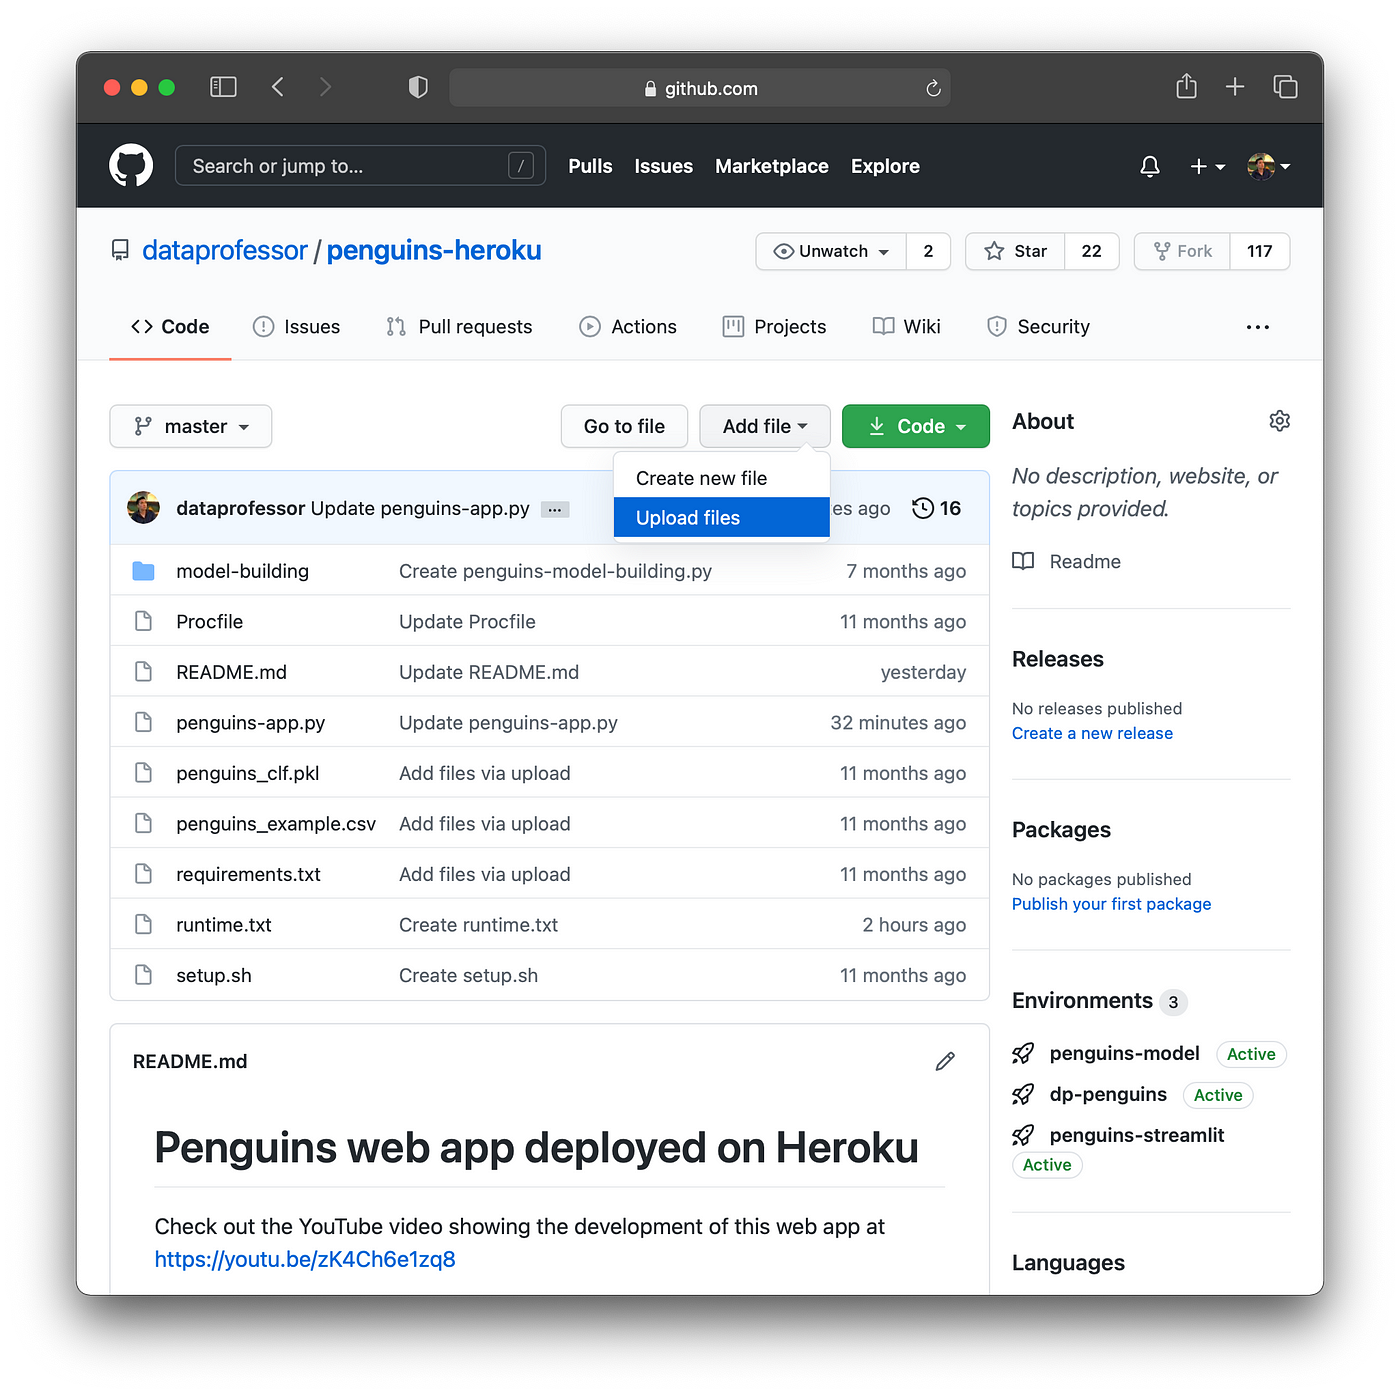
Screenshot showing how to upload files to the GitHub repository.
From the above screenshot, you will see that in addition to the 2 uploaded file we have 5 additional files (Procfile, penguins_example.csv, requirements.txt, setup.sh and runtime.txt) that we will have to create and place inside this repository as well.
Procfile
web: sh setup.sh && streamlit run penguins-app.pypenguins_example.csv
island,bill_length_mm,bill_depth_mm,flipper_length_mm,body_mass_g,sex
Biscoe,43.9,17.2,201.0,4207.0,male
requirements.txt
streamlit==0.61.0
pandas==0.25.3
numpy==1.18.1
scikit-learn==0.22.1
setup.sh
mkdir -p ~/.streamlit/

echo "\
[server]\n\
port = $PORT\n\
enableCORS = false\n\
headless = true\n\
\n\
" > ~/.streamlit/config.toml
runtime.txt
python-3.7.95.2. Create New Files in the Repository
To create a new file directly on GitHub, we can click on Add file > Create new file.
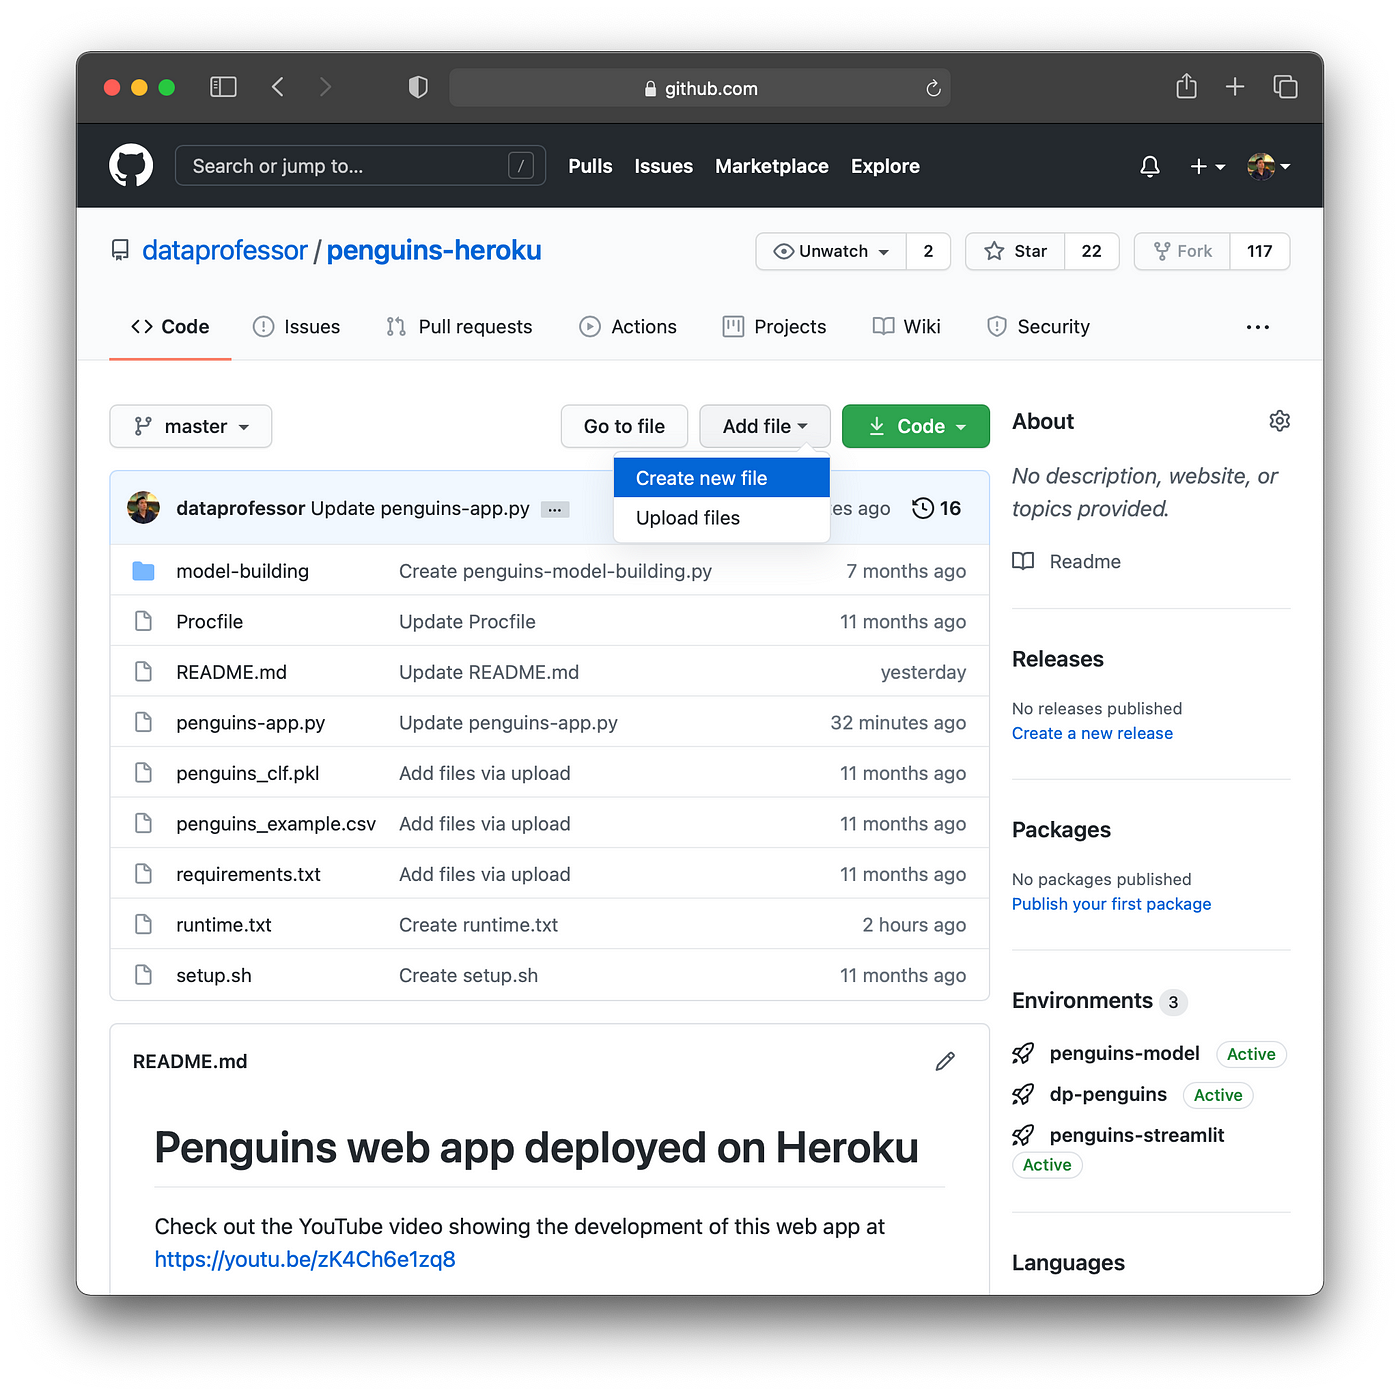
Screenshot showing how to create a new file in the GitHub repository.
In the example below we will create one of the four files mentioned above, which we will start with creating the Procfile file:
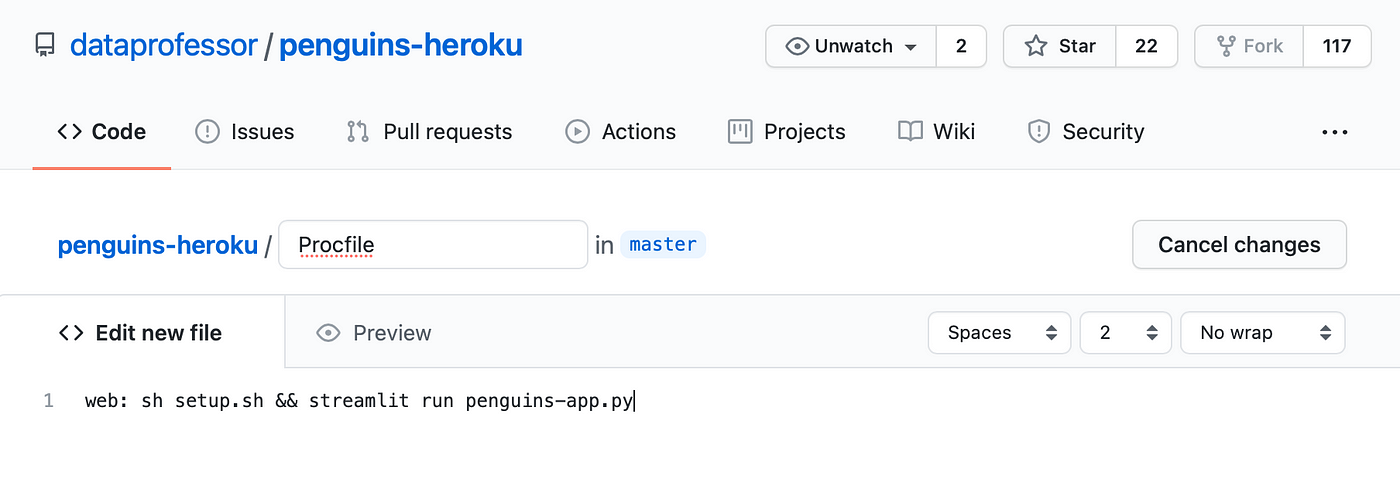
Screenshot showing the creation of the Procfile.
Then, scroll to the bottom of the page and click on the Commit new file button. Afterwards, you should notice the addition of the Procfile to the repository.
Repeat this for the 4 remaining files consisting of penguins_example.csv, requirements.txt, setup.sh and runtime.txt.
6. Deploying to Heroku
Let’s now proceed to deploying the model by heading over to the Heroku website to sign up (if you haven’t already) and log in.
6.1. Sign up to Heroku
To sign up for a free Heroku account find the “Sign up” button at the top right hand corner of the Heroku website as shown below.

Screenshot of where to find the “Sign up” button (indicated by the red rectangle).
6.2. Log-in to Heroku
After sign up, log into your Heroku account.
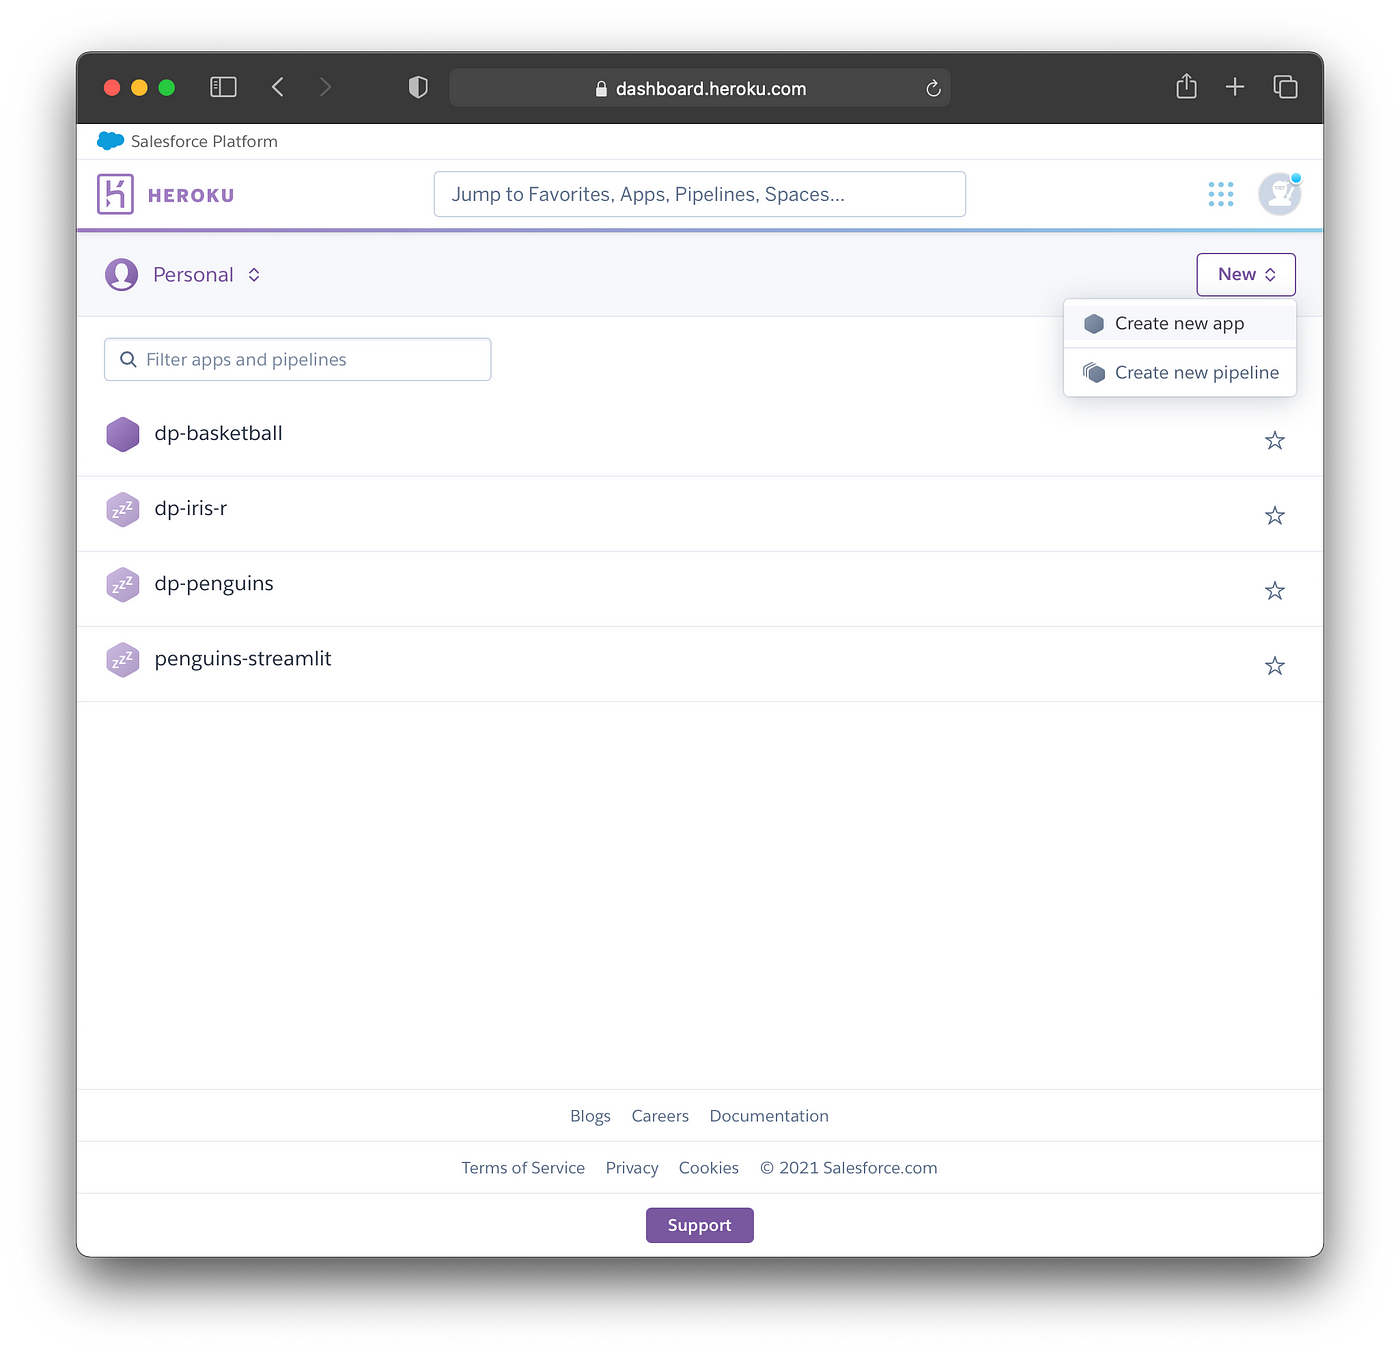
6.3. Creating a New App
To create a new app, click on New > Create new app button as shown in the screenshot below.
Screenshot of where to find the “Create new app” button (top right hand corner).
Now, we’re going to give the app a name, here we will use penguins-model which is still available. It should be noted that if an App name is already taken you will see an error message, if so then you can choose a new name.
To proceed, click on the Create app button at the bottom.
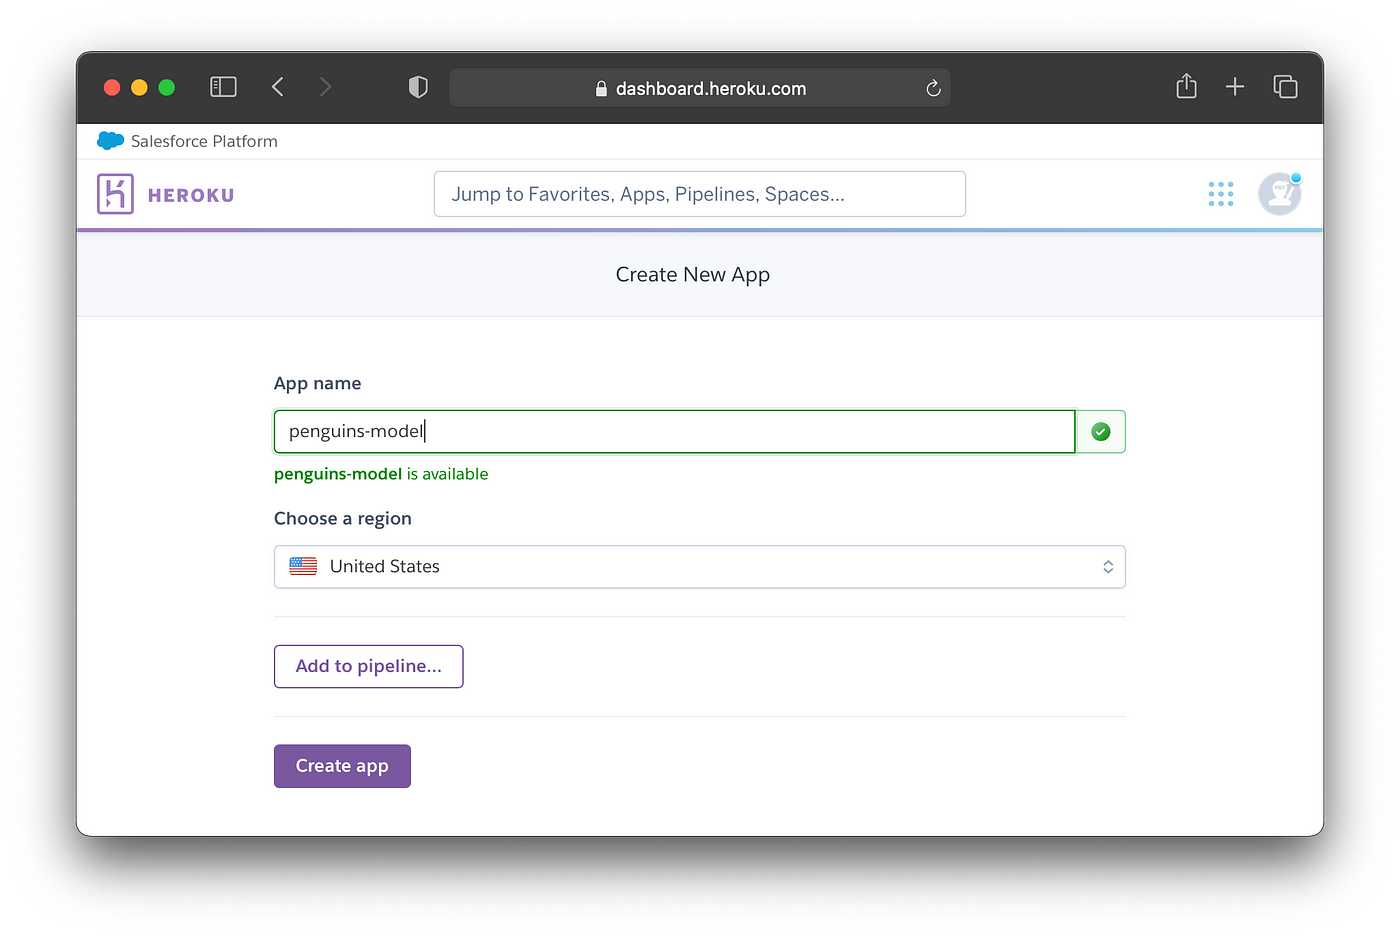
Screenshot showing the naming of the New App.
6.4. Connecting to GitHub
We’re now going to connect our App to the GitHub repository. To do this click on GitHub (Connect to GitHub) as shown in the screenshot below.
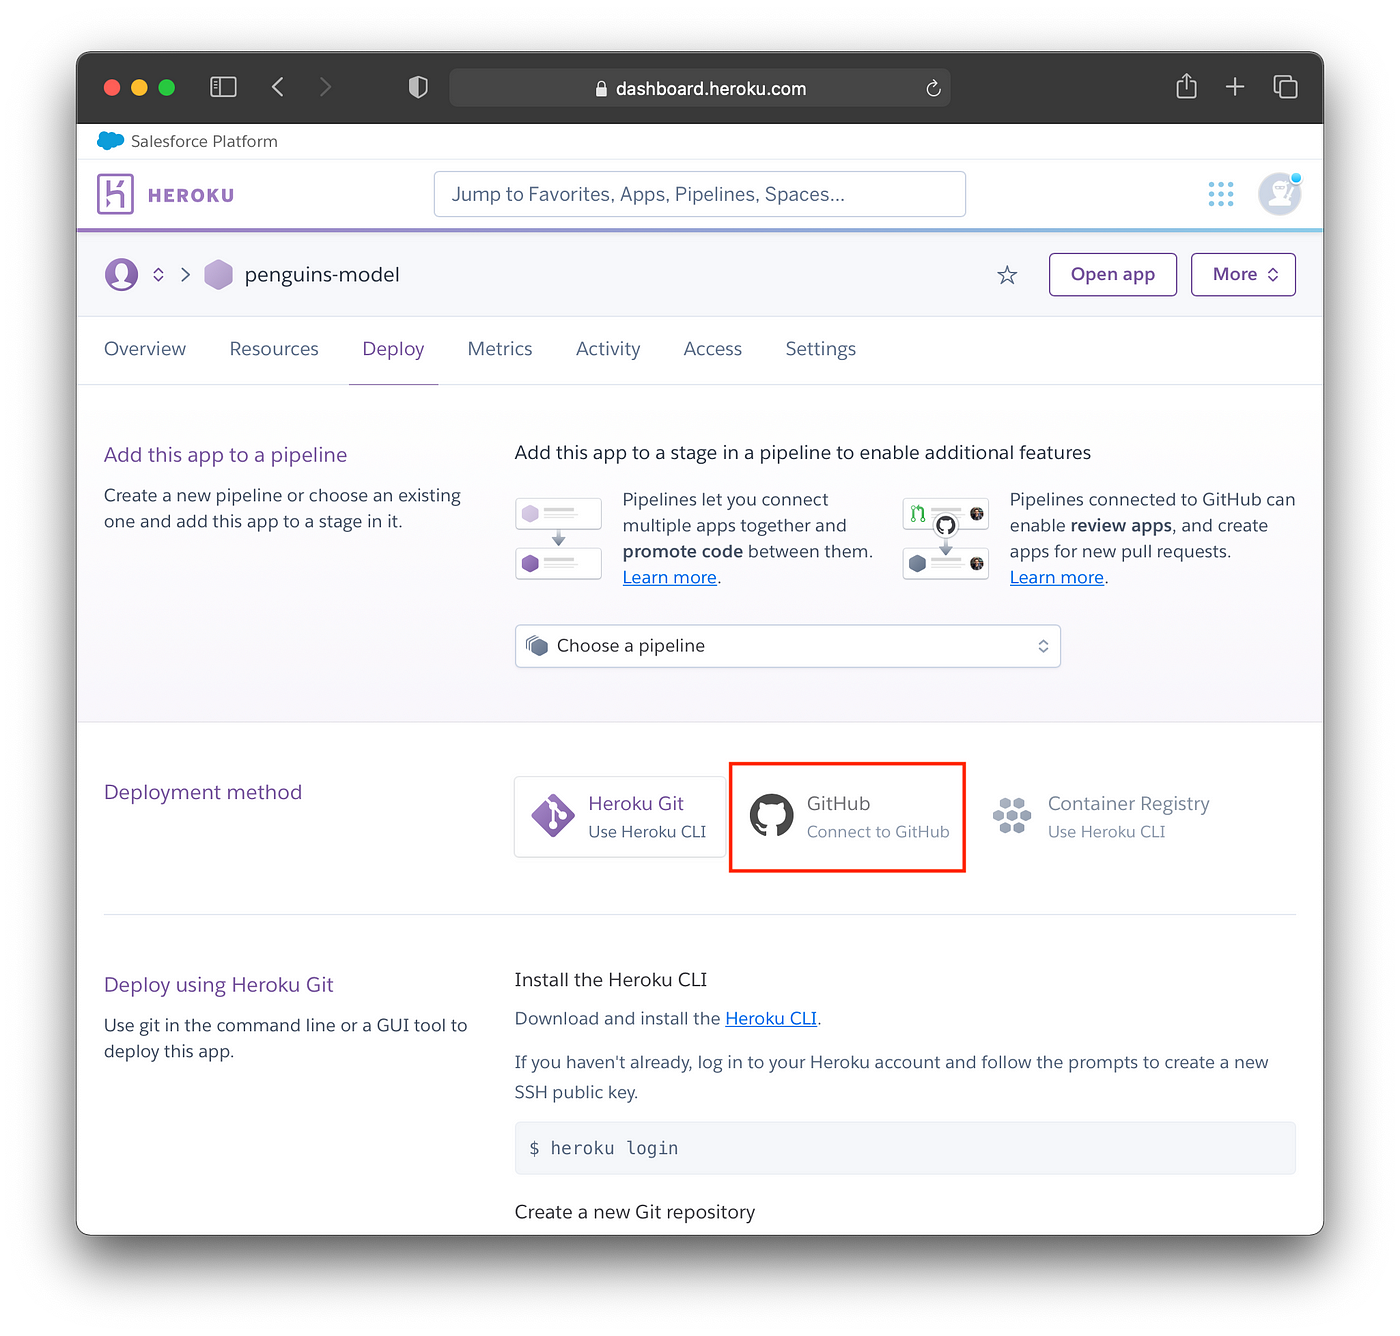
Screenshot showing the Deployment methods.
If this is your first time deploying to Heroku, you will have to authenticate your GitHub account and give Heroku permission to access it. This is done once per Heroku account.
Now, type in the name of the GitHub repository that you have just created into the text box and click on Connect.
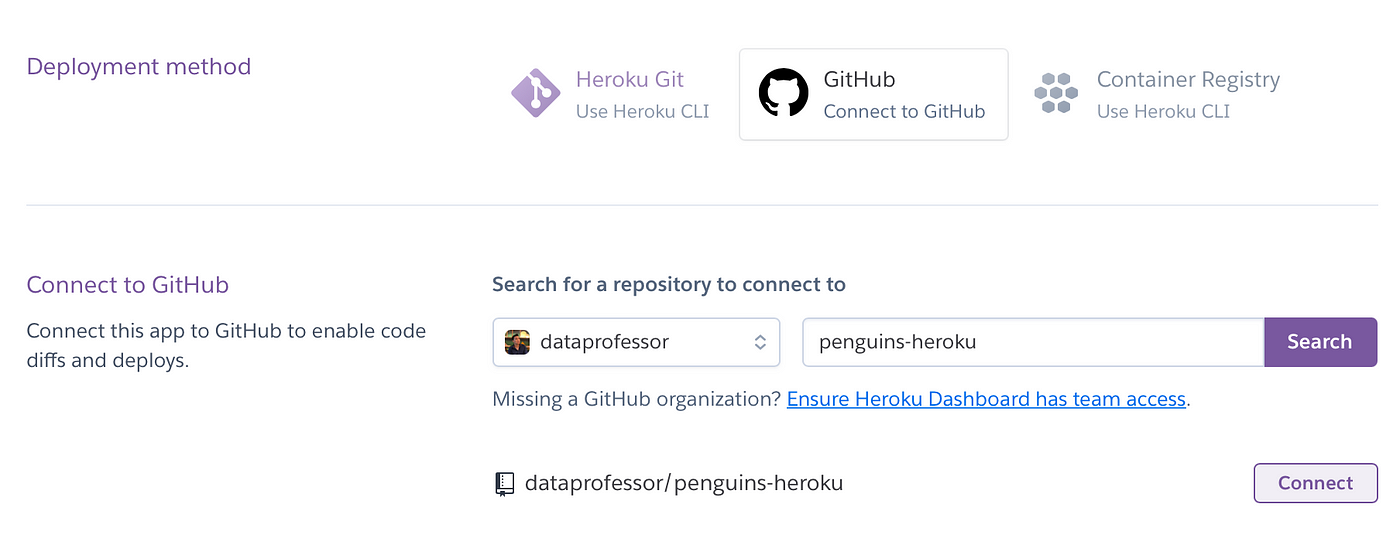
Screenshot showing the entry of the GitHub repository’s name for the Penguins App.
6.5. Deploying
If this was successful, you’ll see the Connected to dataprofessor/penguins-heroku message. It should be noted that we can activate Automatic deploys but this is recommended after Manual deploy is successful. Thus, we can come back and activate this later.
Now, scroll down and click on the Deploy Branch button.
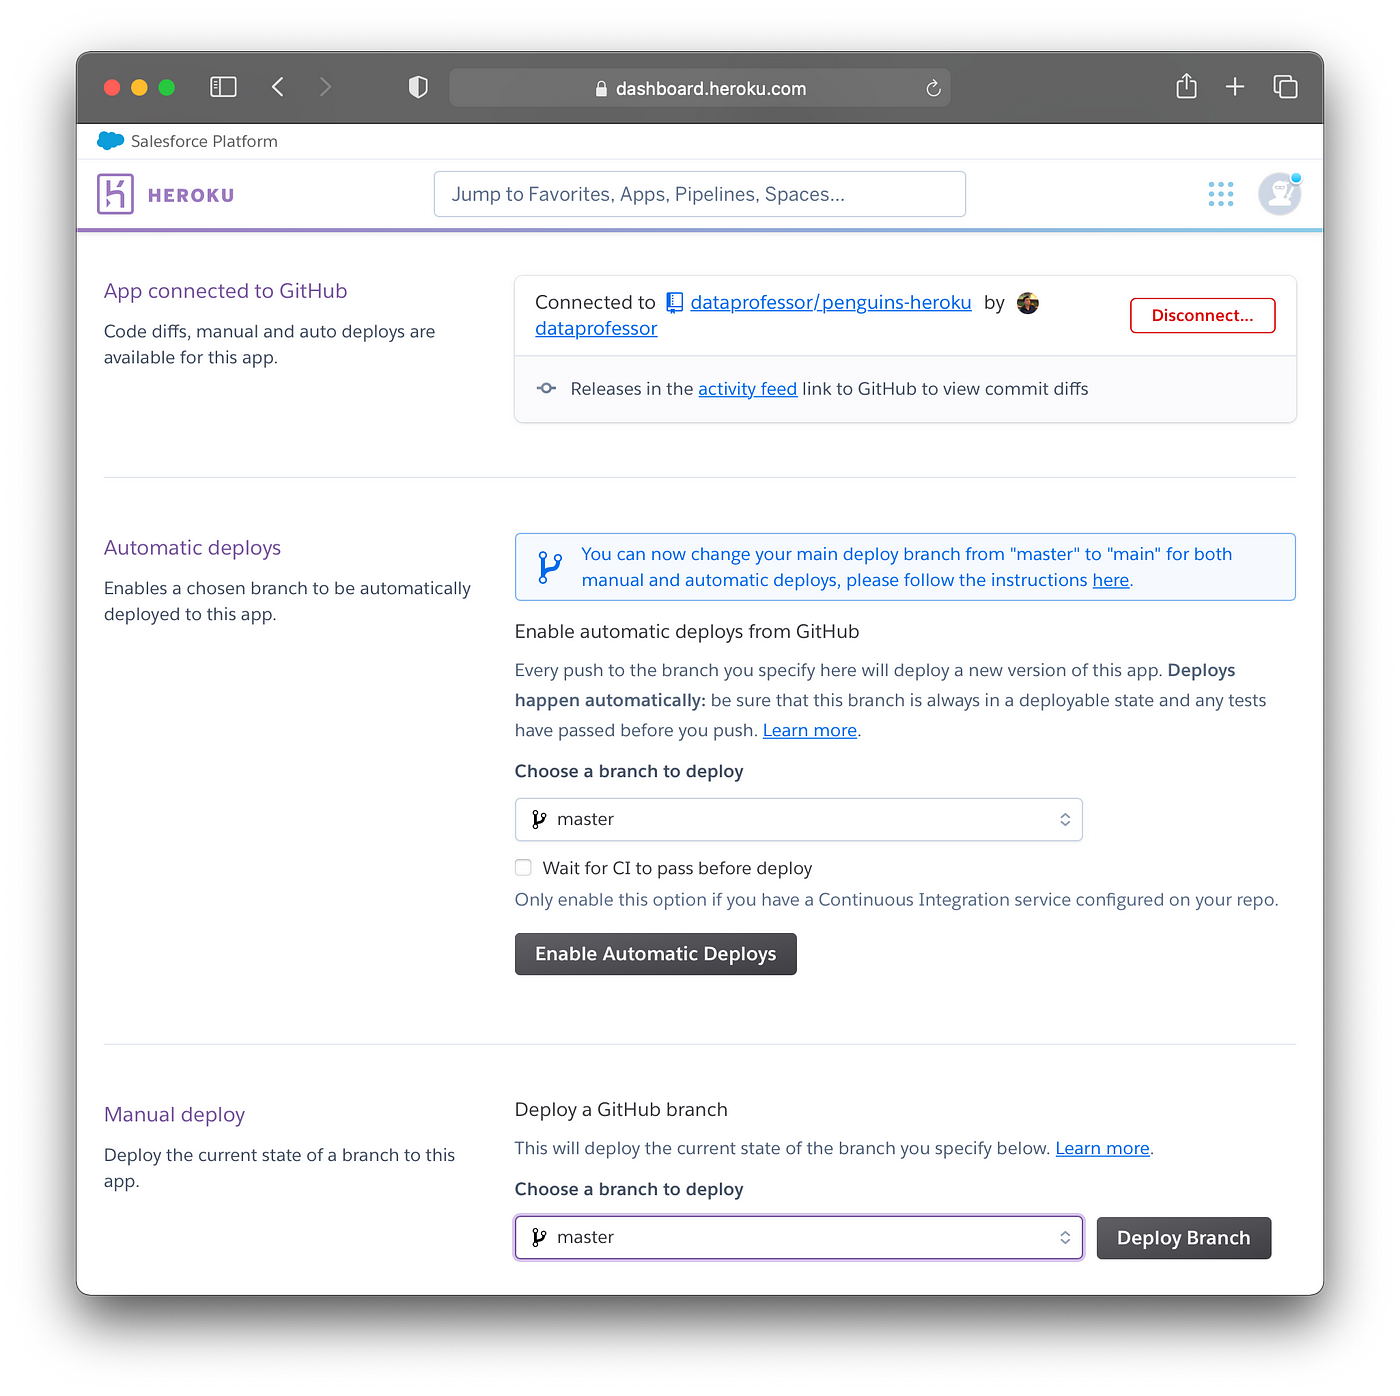
Screenshot showing the connected GitHub repository as well as Automatic deploys and Manual deploy.
The build log will update as the container is provisioned and prerequisite libraries are being installed.
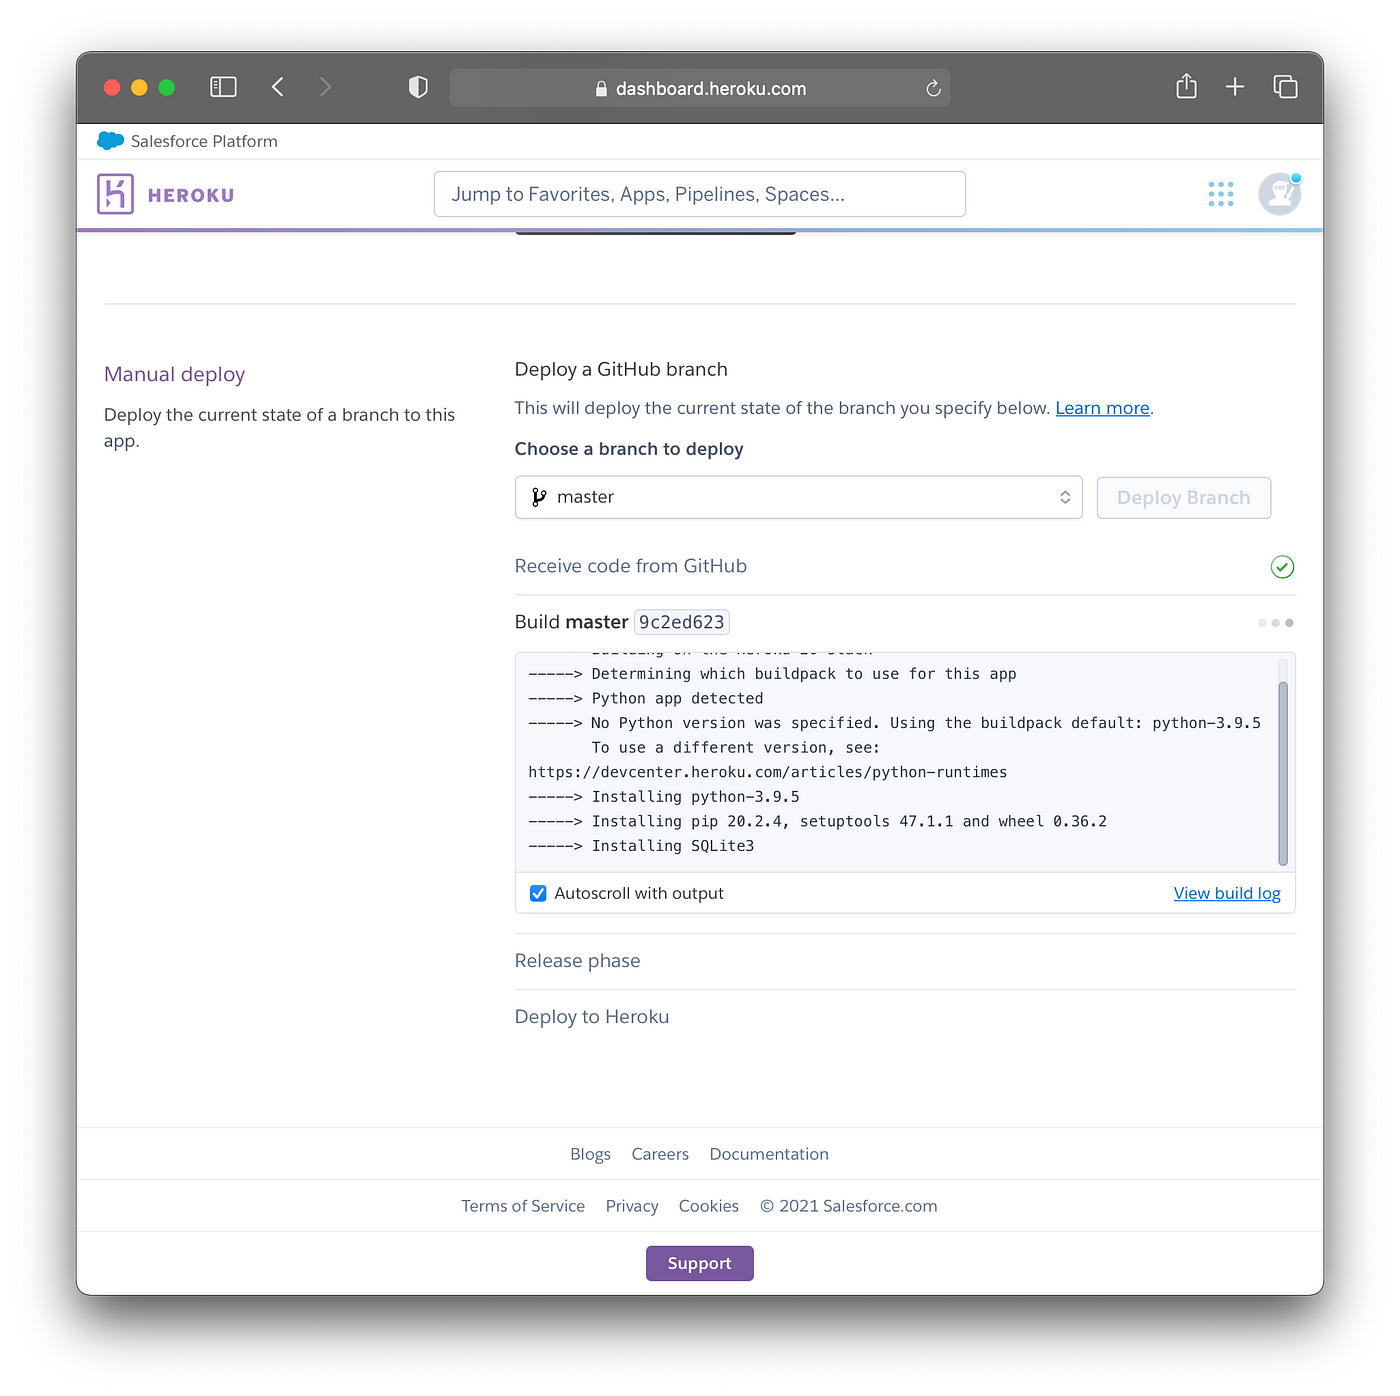
Screenshot showing the provisioning of the container and library installation.
After the container have been provisioned and libraries have been installed successfully, you should see the message Your app was successfully deployed.
Now, click on the View button to launch the deployed web app.
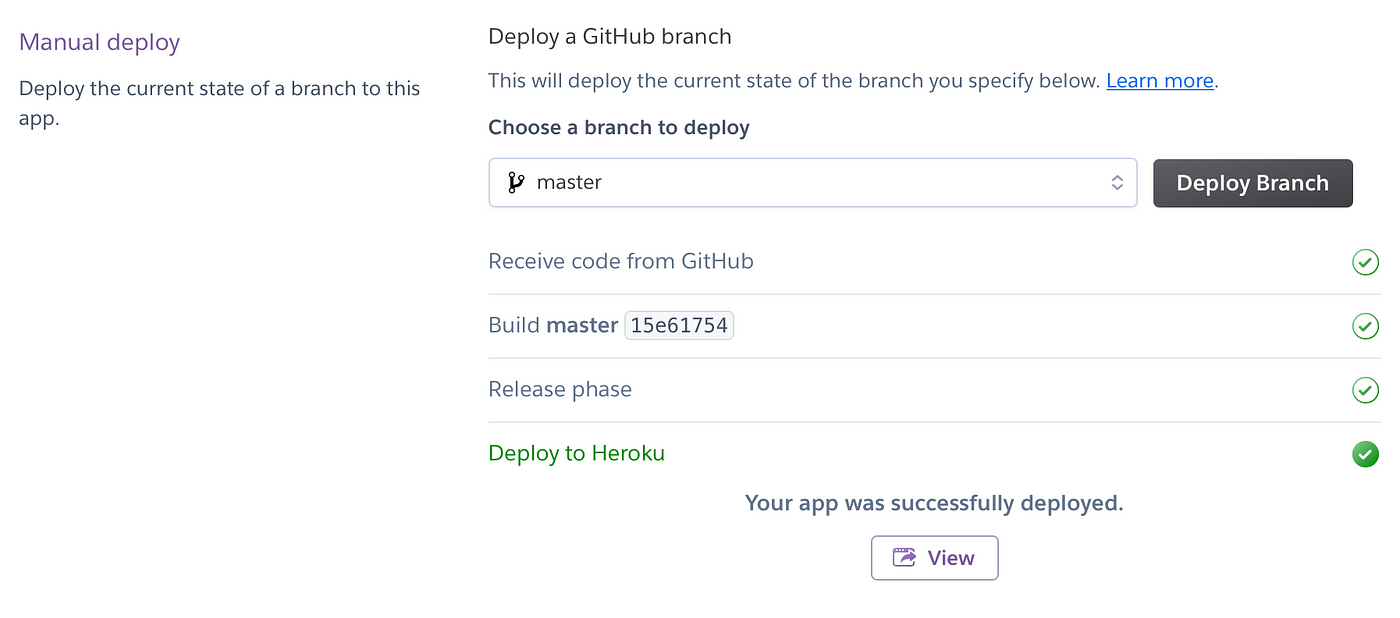
Screenshot showing the successful message of the deployed app.
7. Deployed Penguins App
If you see the web app with no error message, congratulations! You have now successfully deployed the Penguins App. Click on the following link if you would like to see a Demo of the Penguins App.
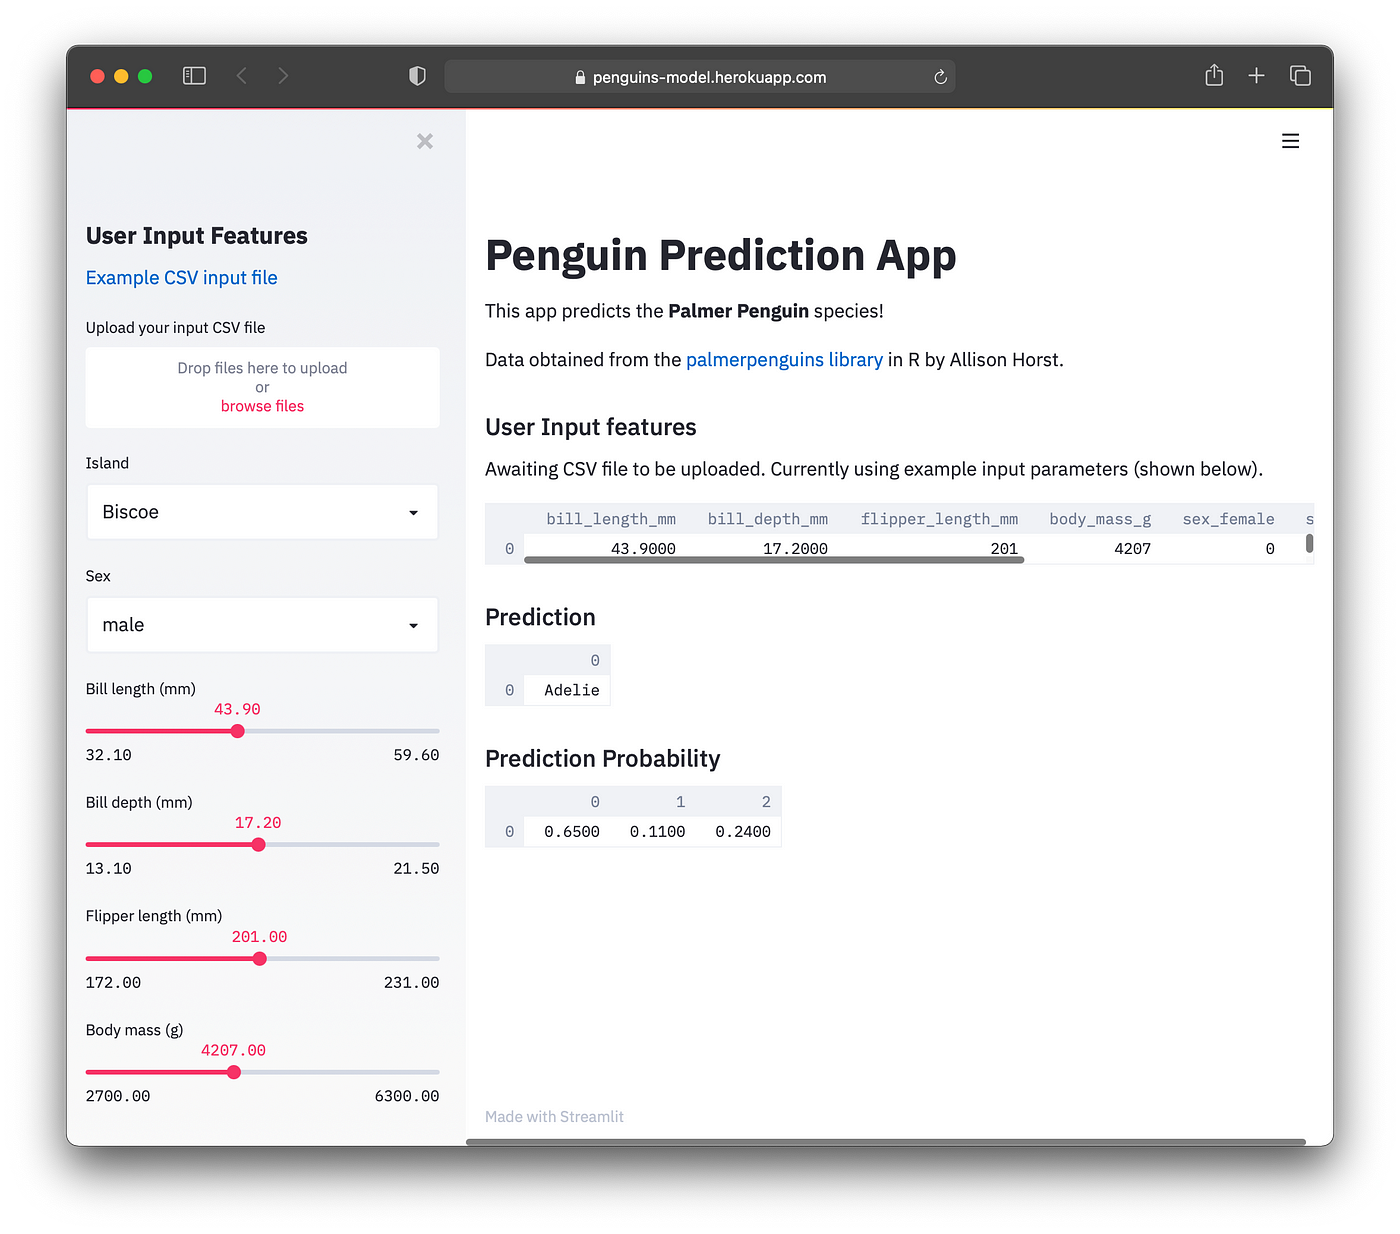
Screenshot of the deployed Penguins App on Heroku.
Created (with license) using the image by Faber14 from envato elements.