- Data Professor
- Posts
- I coded a YouTube AI Assistant that boosted my productivity
I coded a YouTube AI Assistant that boosted my productivity
A step-by-step tutorial in Python
Chanin Nantasenamat
September 11, 2024

Have you ever found yourself in a position where you needed to sift through a lot of YouTube videos to learn or research about a particular topic? Watching hours and hours of videos, taking notes, and still overlooking important details is a genuine struggle.
In this article, I’ll go over the process of how I saved countless hours extracting key information from YouTube videos. I did this by building a Python workflow that makes use of large language models (LLMs) to answer any questions about the video content. This not only saved me hours, but it also boosted my productivity and enhanced my learning. As a result, I can use the extra time to create more content or take a well-deserved break.
Let me walk you through the process of how I created this YouTube AI assistant. Let’s dive in!
Why I Built This YouTube AI Assistant?
Before proceeding to the technicalities, let’s explore why this project has been a game-changer for me.
At the core of what I’m doing on a daily basis in my full-time role as a developer advocate and in my part-time endeavor as a YouTuber (I run the Data Professor YouTube channel) is content research.
In a nutshell, here’s how this translates into a more streamlined and effective approach to content research and consumption:
Time Saver: I can now quickly find key information from videos without watching them entirely by simply asking questions.
Efficient Learning: Summarizing the main points of the video content now takes just a fraction of the time that it used to take.
Productivity Booster: Content research that once took weeks is sped up to literally days.
Overview of the Workflow
The YouTube AI assistant can be broken down into these 3 main steps:
Extract and Download Audio: An audio file is downloaded from YouTube using the YT-DLP Python library.
Transcribe Audio to Text: The downloaded audio file is transcribed to text using the AssemblyAI Python library.
Answer Questions: Questions about the YouTube video content can be answered using the LeMUR model from AssemblyAI. Particularly, the underlying large language model is Anthropic’s Claude 3.5 Sonnet.
This workflow can be visually summarized in the following schematic illustration:
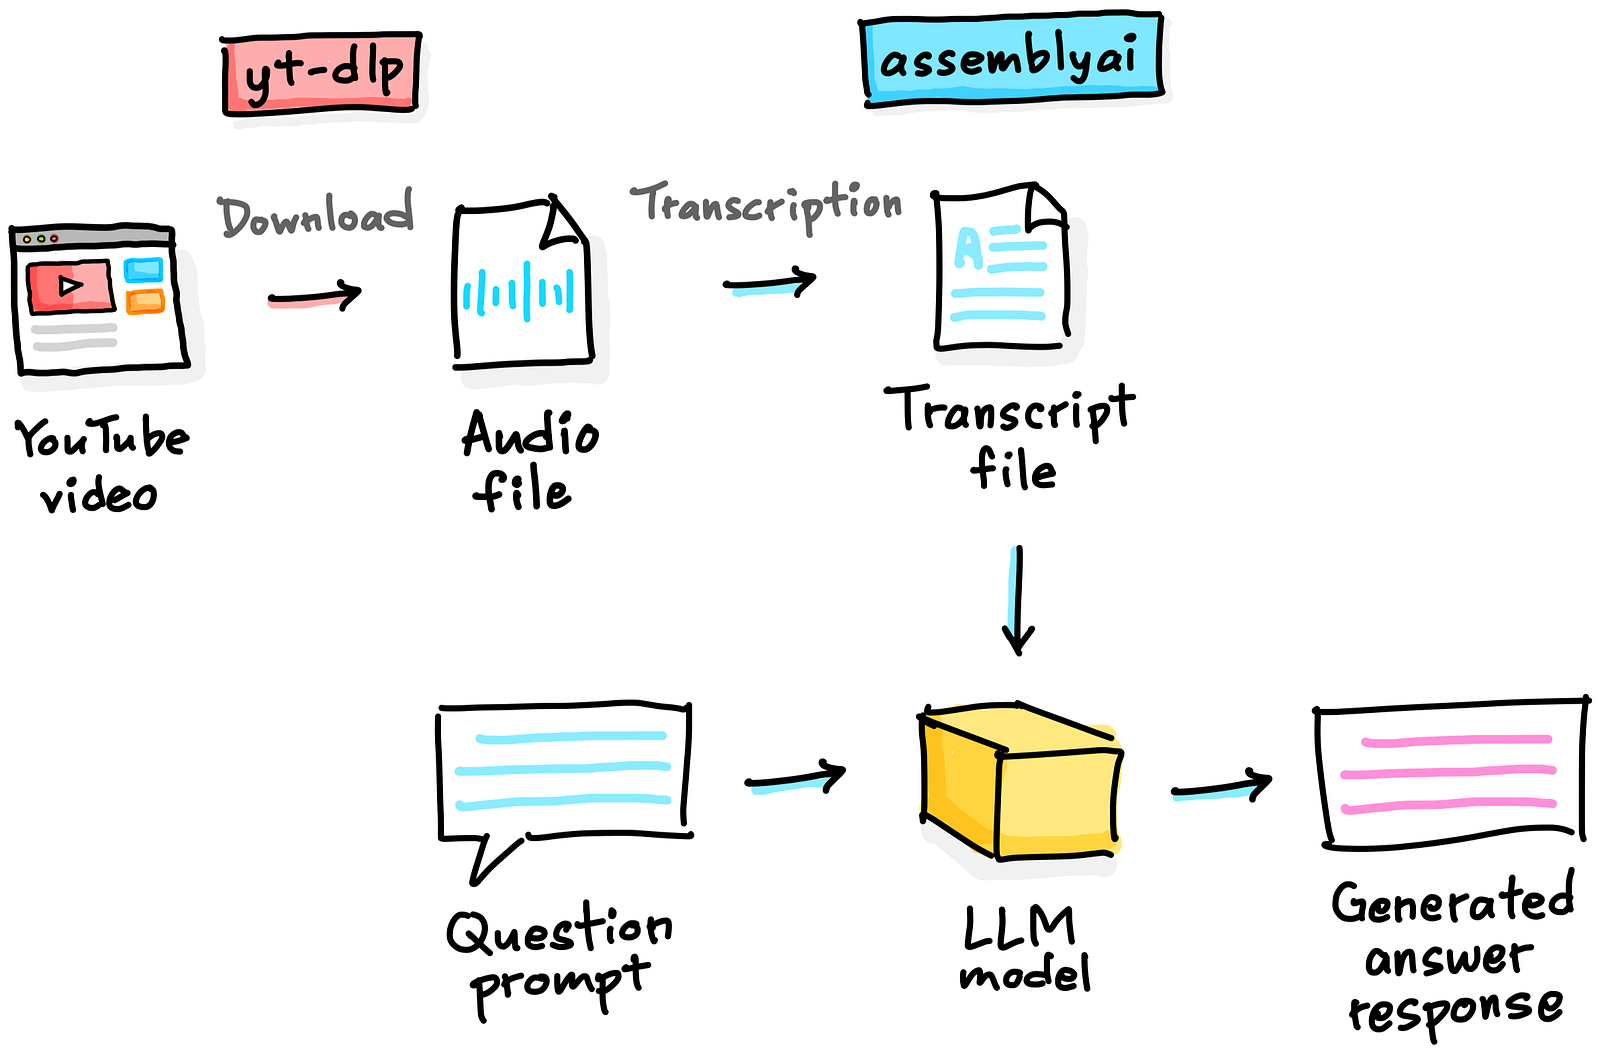
Schematic illustration of the YouTube Q&A workflow. Drawn by the Author.
Disclaimer
Before diving into the technicalities, it is worth mentioning that the workflow described in this article provides functionality that may allow users to download audio from videos. Users are strongly advised to respect copyright laws and the terms of service for any video content that they wish to use. The author is not responsible for any misuse or copyright infringement resulting from the use of this workflow.
Prerequisites
First, fire up a terminal or command line prompt and enter the following to install the necessary Python libraries:
pip install yt-dlp assemblyaiLoading the API Key
To use the audio transcription functionality and the LeMUR model for performing the question-answering, you’ll need to generate an API key from AssemblyAI.
Next, let’s save it in your Google Colab’s secrets management:
Screencast on saving the API key in Google Colab’s secrets management.
To load the API key, enter the following in a code cell:
from google.colab import userdata
import assemblyai as aai

aai.settings.api_key = userdata.get('AAI_KEY')
Note that this enables us to easily store the API key into the notebook’s environment, so no more manual entry of the API token.
Adjust this code if you’re not using Google Colab.
Downloading the Audio
The first part of our workflow is to retrieve the audio from the YouTube video and for that we’re using the yt_dlp Python library.
Here’s the download_audio() function that I wrote to download audio from a YouTube video:
import yt_dlp

def download_audio(url):
    ydl_opts = {
        'format': 'bestaudio/best',
        'postprocessors': [{
            'key': 'FFmpegExtractAudio',
            'preferredcodec': 'mp3',
            'preferredquality': '192',
        }],
        'outtmpl': '%(title)s.%(ext)s',
        'verbose': True,
    }
    with yt_dlp.YoutubeDL(ydl_opts) as ydl:
        ydl.download([url])
Next, we’ll define the URL to a YouTube video (i.e. we’re using How I would learn to code (If I had to start over)) in a variable called URL, which we’ll use as the input parameter to the download_audio() function.
URL = "https://www.youtube.com/watch?v=wB7IU0EFN68"
download_audio(URL)
In a few short moments, this will download and save the audio to a file in the format of <file_name>.mp3, thus in this case we have How I would learn to code (If I had to start over).mp3.
Before proceeding further, we’ll store the audio file name to a variable called video_title. Finally, we create a variable called audio_file to store the audio file name:
audio_file = f'{video_title}.mp3'Transcribing the Audio
Now, let’s transcribe the audio using AssemblyAI, which we’ll first create a transcriber object by calling the Transcriber() function.
Next, we’ll apply the transcribe() method on the transcriber object while also assigning the audio file name as an input parameter.
transcriber = aai.Transcriber()
transcript = transcriber.transcribe(audio_file)
The transcript variable is an object that returns the following:
<assemblyai.transcriber.Transcript at 0x7a72805dd900>which doesn’t quite return a human-readable text just yet.
Answering Questions
Define the question prompt
First, we’ll define the question that we want to ask about the video as a prompt that is also stored in the prompt variable.
prompt = "What are the 5 key messages that was mentioned in this video?" Now that we have the transcript and prompt ready, we can proceed further with generating our answer!
LLM response generation
We’ll do this by using the LeMUR model, which is performed by appending the lemur.task() method to the transcript object.
result = transcript.lemur.task(
    prompt,
    final_model=aai.LemurModel.claude3_5_sonnet
)
From the above code snippet, you’ll also see that we’re using the Claude 3.5 Sonnet model as the LLM model (final_model=aai.LemurModel.claude3_5_sonnet).
LLM generated output
Let’s now take a look at the generated output that is stored in the result variable.
LemurTaskResponse(request_id='a79f9c15-4af6-4b38-9c58-eea46e53b5a1', usage=LemurUsage(input_tokens=2630, output_tokens=189), response="Based on the transcript, here are 5 key messages mentioned in the video:\n\n1. Choose a programming language to start with, and don't let analysis paralysis stop you. Python is recommended if you're unsure where to begin.\n\n2. Find and utilize available learning resources, including free platforms like Freecodecamp, Kaggle Learn, Geeksforgeeks, and YouTube channels.\n\n3. Start with the basics and apply what you learn to real-world problems or projects that interest you to stay motivated.\n\n4. Learn in public by sharing your journey and knowledge through social media posts, blogs, or tutorials. This helps solidify your understanding and connects you with other learners.\n\n5. Participate in coding challenges and lend a helping hand to others. This reinforces your knowledge, helps you identify areas for improvement, and contributes to a positive community.")From the above output, we can see that we can print out the following:
Request ID (
request_id)Number of input tokens use (
input_tokens)Number of output tokens (
output_tokens)Generated response (
response)
Thus, to print the generated response we can use the following:
print(result.response)And this would display the generated response and yes you’ll notice that the text overflows beyond the margins.
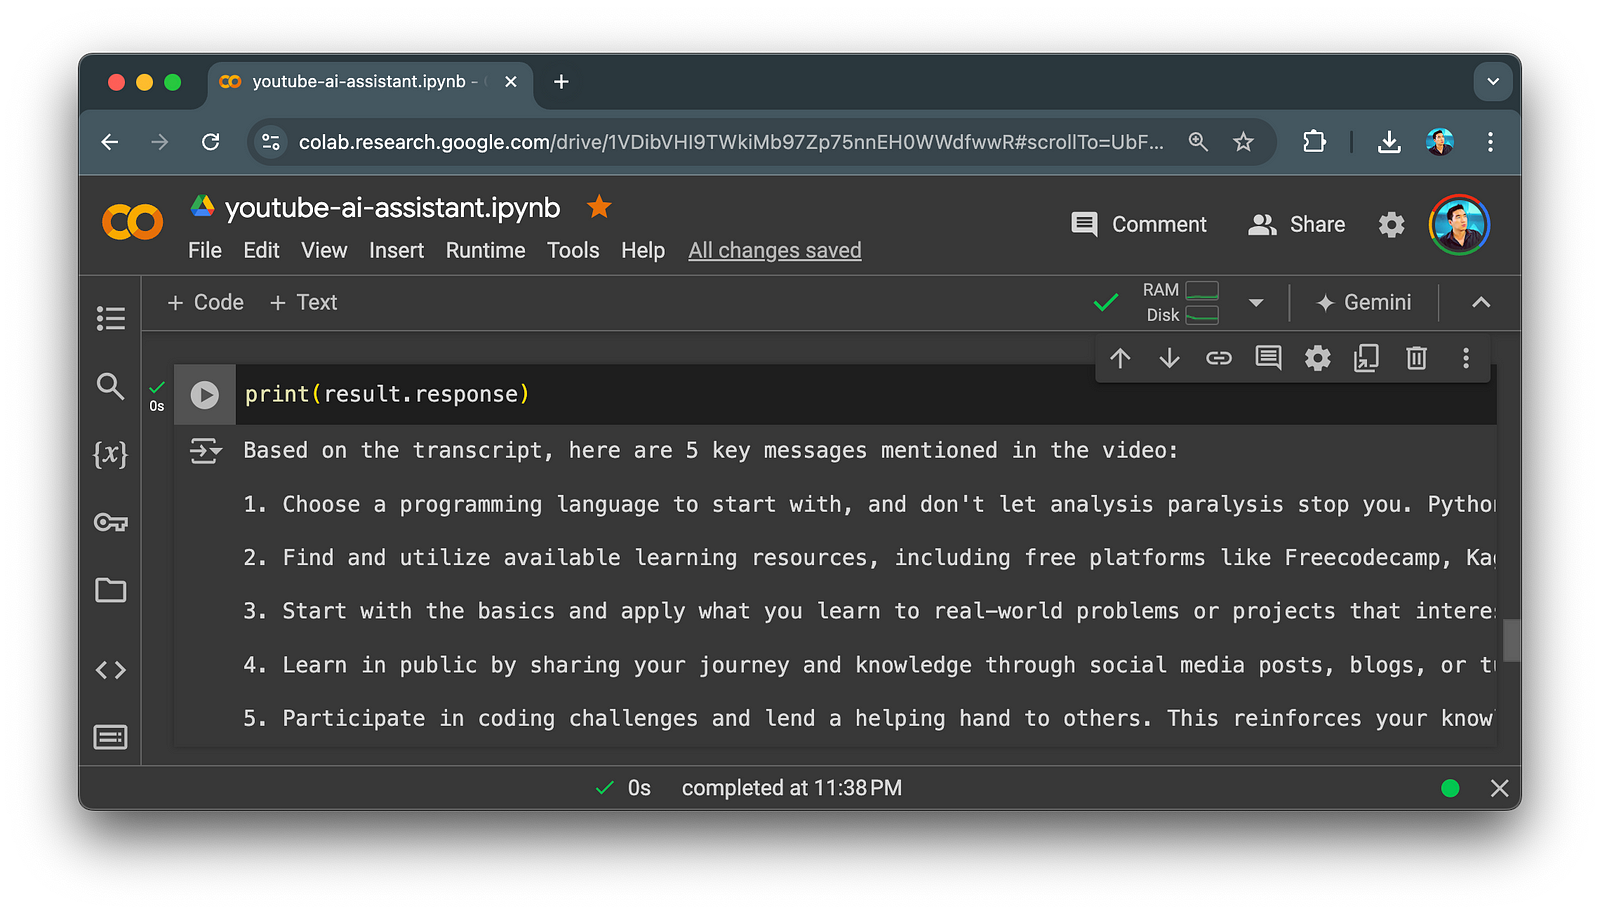
Screenshot of generated summary text output. Image by Author.
To remedy this, we can apply word wrapping to the Jupyter text cell settings like so:
from IPython.display import HTML, display

def set_css():
  display(HTML('''
  <style>
    pre {
        white-space: pre-wrap;
    }
  </style>
  '''))

get_ipython().events.register('pre_run_cell', set_css)
And just like that you have a nicely formatted text that can be read without excessive horizontal scrolling.
Screenshot of generated summary text output. Image by Author.
Deleting the task
If you’d like to delete the task (i.e. perhaps for privacy concerns) you can append purge_request_data() to aai.Lemur while also passing the request ID to the request_id parameter.
deletion_response = aai.Lemur.purge_request_data(request_id=result.request_id)
deletion_response
And you’ll see a confirmation output like so to confirm that is has successfully been deleted.
LemurPurgeResponse(request_id='b28a07f8-c3ab-46f6-b5d8-8fc8b5417c0b', request_id_to_purge='0a8a07f8-c3ab-46f6-b5d8-8fc8b5417c0b', deleted=True)Quick Recap of our Question Answering task
As a recall, our question prompt for the How I would learn to code (If I had to start over) video was:
“What are the 5 key messages that was mentioned in this video?”And the LLM generated answer is as follows:
Based on the transcript, here are 5 key messages mentioned in the video:

1. Choose a programming language to start with, and don't let analysis paralysis stop you. Python is recommended if you're unsure where to begin.

2. Find and utilize available learning resources, including free platforms like Freecodecamp, Kaggle Learn, Geeksforgeeks, and YouTube channels.

3. Start with the basics and apply what you learn to real-world problems or projects that interest you to stay motivated.

4. Learn in public by sharing your journey and knowledge through social media posts, blogs, or tutorials. This helps solidify your understanding and connects you with other learners.

5. Participate in coding challenges and lend a helping hand to others. This reinforces your knowledge, helps you identify areas for improvement, and contributes to a positive community.
If you’d like to follow along, there’s a video companion to this article:
Conclusion
In summary, the YouTube AI assistant built in this article has significantly helped my video content research. It’s also an excellent starting point for more complex projects, for instance, a more extended multi-video research compilation, additional content summaries and analysis, etc.
All code snippets described herein are compiled into a single Jupyter notebook, please feel free to explore it and adapt it to your own needs. I’d love to hear how you’ve adapted this for your own learning journey, so do share in the comments section.